Growing microgreens at home is one of the easiest and most rewarding ways to bring fresh, nutrient-dense greens into your daily routine. They grow quickly, require very little space, and deliver an incredible boost of vitamins, minerals, and antioxidants. Whether you're brand-new to gardening or looking to expand your indoor setup, microgreens are the perfect place to start.

One of the best ways to grow microgreens year-round is by using the Vego Garden 4-Tier Indoor Gardening Grow Light. It creates the perfect conditions for consistent, vibrant growth, even if you don't have natural sunlight or outdoor space. Below, I'll walk you through the step-by-step process of growing your own broccoli microgreens at home.
As an Amazon Associate, I earn from qualifying purchases.
This recipe features several affiliate links, meaning I will earn a small commission if you purchase through these links.
Why Grow Microgreens at Home?
Microgreens offer incredible benefits:
- Nutrient-dense: Microgreens have a ton of health benefits. They contain concentrated levels of vitamins A, C, K, and B-complex.
- Fast-growing: Ready to harvest in just 7-10 days, and can be grown any time of year.
- Space-efficient: Perfect for small apartments, kitchens, and indoor gardening setups.
- Low maintenance: Minimal equipment, no drainage trays, and very little water required.
- Versatile: Great for salads like my Rainbow Sweet Potato Kale Salad, smoothies, sandwiches, avocado toast, grain bowls, and more.
Growing them yourself ensures maximum freshness, and it's significantly more affordable than buying them every week from the grocery store.

Equipment You Need
- Small shallow trays: There are a couple of different ways to grow microgreens at home, but I have found that using shallow growing trays is the most foolproof way to grow them.
- Indoor organic potting soil: Essentially, you can use any dirt, but I've found that an indoor potting mix works best.
- Spray bottle: This helps to water evenly and prevent overwatering.
- Broccoli microgreen seeds: There are so many seeds that can be used to grow microgreens. I like broccoli because it is highly nutritious, and it has smaller seeds, so they mix into the soil "THEALLNATURALVEGAN" for 10% off!
- Vego Garden 4-Tier Indoor Gardening Grow Light: This is my favorite indoor gardening system. It is hands down the best way to garden indoors. The multi-tier design and powerful grow lights make it incredibly easy to grow fresh herbs, greens, and microgreens year-round, no matter how much natural light your home gets. Use code: "THEALLNATURALVEGANGROW5" for 5% off the grow light! If you don't have an indoor gardening system, you will just need some sort of light source, such as a bright window. It's important to avoid direct sunlight.
- Scissors for harvesting: Any scissors will work.

How to Grow Microgreens at Home:
- Step 1: Prepare the Tray
- Use a small, shallow plastic tray. It does not need drainage holes, which keeps the process simple and mess-free.
- Fill the tray with 1-2 inches of indoor potting soil and lightly press it down to create an even, level surface. A firm, smooth base helps the seeds germinate evenly.
- Step 2: Moisten the Soil
- Use a spray bottle to evenly mist the soil until it's damp but never soggy. The goal is moist soil that feels like a wrung-out sponge; this allows the seeds to absorb water without risk of mold or rot.
- Step 3: Sow the Seeds
- Sprinkle broccoli microgreen seeds evenly across the soil surface. Microgreens thrive when seeded densely, so you can be generous here. The seeds should almost cover the surface in a single layer.
- Do not bury the seeds; they sprout best on top of the soil.
- Step 4: Press and Cover
- Lightly press the seeds into the soil so they have good contact, which improves germination rates.
- Mist again, then cover the tray with a lid, cutting board, or another tray. This keeps moisture in and creates a warm, dark environment that encourages the seeds to sprout.
- Step 5: Set Up the Grow Light
- Place your covered tray on one of the tiers of the Vego Garden 4-Tier Indoor Gardening Grow Light.
- Once the seeds sprout, usually after 2-3 days, remove the cover and turn on the grow light. Keep the light on for 12-16 hours a day, mimicking natural daylight.
- The Vego Garden system ensures the perfect light distance and intensity, preventing leggy, weak sprouts and promoting strong, vibrant growth.
- Step 6: Water and Uncover
- After uncovering the tray, continue lightly misting the soil once or twice daily. The key is to keep the soil evenly moist without overwatering.
- If the surface looks dry, give it a light spray. If you ever notice pooling water, skip watering for the day.
- Step 7: Grow and Harvest
- Your broccoli microgreens will be ready to harvest in 7-10 days, once they reach about 2-3 inches tall and have developed their first true leaves.
- Use clean scissors to trim the microgreens just above the soil line. Rinse gently under cool water and pat dry before using (only rinse right before serving).
Storage:
Storing microgreens properly helps keep them fresh, crisp, and nutrient-dense for as long as possible. Here's the best way to do it:
- Harvest Without Washing
- Cut your microgreens just above the soil line.
- Avoid washing them before storage; excess moisture causes wilting and faster spoilage (You can rinse right before using.)
- Gently Dry if Needed
- If any moisture is present, pat the microgreens dry with a clean towel.
- They should be completely dry before storing.
- Use an Airtight Container
- Line a glass or plastic airtight container with a dry paper towel.
- Add the microgreens in a loose layer, then place another paper towel on top to absorb humidity. Replace the paper towels every couple of days.
- Refrigerate Properly
- Store the container in the crisper drawer or a colder area of your fridge.
- This slows moisture buildup and is a great way to keep greens crisp.
- Shelf Life
- Homegrown microgreens typically stay fresh for 5-7 days, depending on the variety.
- Hardier greens like broccoli or radish often last the longest.
- Refresh Before Eating
- Right before serving, rinse gently with cold water and pat dry.
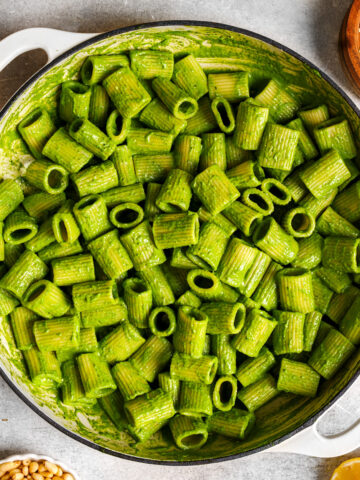
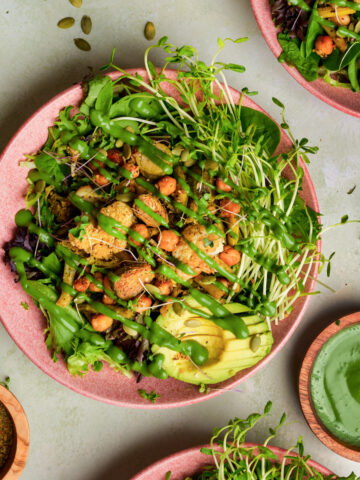
- This revives their texture and makes them taste freshly harvested, perfectly for sprinkling on top of my Raw Vegan Taco Salad.

Variations & Substitutions:
- Microgreen Seed Options:
Broccoli is great for beginners, but you can easily swap the type of seed or mix in radish microgreens, kale microgreens, sunflower seeds, pea shoots, mustard, or mixed microgreen blends for different flavors and nutrient profiles. - Soil Alternatives:
Indoor potting soil works perfectly, but you can also use coconut coir, seed-starting mix, or hemp mats if you prefer cleaner, low-mess growing mediums. - Tray Substitutes:
Any shallow, wide container works, even recycled produce containers or takeout trays, as long as they're 1-2 inches deep. - Lighting Options:
A grow light (like the Vego Garden 4-Tier system) ensures strong, even growth, but microgreens can also grow near a bright south-facing window if you don't have a grow light. - Watering Adjustments:
Misting works best for delicate greens, but bottom-watering (adding water to the tray below) can be swapped in once sprouts are established to reduce mold risk. - Harvest Timing Variations:
Most microgreens are ready in 7-10 days, but fast growers like radish can be harvested in 5 days, while sunflower and pea shoots often need 10-14 days for full flavor. - Flavor Variations:
For spicy microgreens, grow mustard, radish, or arugula.
For mild and sweet, choose broccoli, cabbage, sunflower, or pea shoots.
For nutrient-density, try kale, red cabbage, or mixed brassicas. - Reuse Tip:
You can reuse the same growing setup repeatedly, just compost the old soil and refresh with a new layer before reseeding.
Tips for the Best Microgreens:
- Don't overwater: Moist, not soaked, is the key to preventing mold.
- Keep seeds in the dark for germination: Covering the tray helps sprouting happen quickly and evenly. The easiest way is to wait until they've sprouted to turn on the grow light.
- Use a grow light: Especially in winter months, microgreens need strong light to stay compact and vibrant. If you don't have a grow light, I recommend placing the trays on a sunny windowsill.
- Harvest on time: Overgrown greens become bitter.
- Try different varieties: Radish, pea shoots, sunflower, beet, and kale all make excellent microgreens. I love sprinkling kale microgreens on my Creamy Vegan Truffle Pasta!
FAQs
Technically yes, but it's not ideal. The old root matter can encourage mold, so it's best to use fresh potting soil for each new batch.
Yes! Microgreens are often 4-40x more nutrient-dense than their mature counterparts, making them an easy daily boost for salads, bowls, smoothies, and more.
No, you only need a shallow tray, potting soil, seeds, and a grow light. Artificial light systems like the Vego Garden 4-Tier Indoor Gardening Grow Light simply make the process even easier and more reliable.
No. While both are young plants, they're grown and harvested differently. Sprouts are grown entirely in water without soil and are typically ready to eat in 3-7 days. You eat the entire sprout, including the seed, stem, and root. Microgreens are grown in soil or another growing medium and are harvested after they develop their first true leaves, usually 7-21 days later. Only the stems and leaves are eaten. Both are incredibly nutritious, but sprouts are quicker to grow, while microgreens offer a wider variety of flavors and textures. Make sure to check out my How to Grow Sprouts at Home guide as well!
Recipes To Make With Microgreens!
Add Microgreens to these recipes for a quick nutrition boost!


Comments
No Comments